Now we are going one step further by introducing Terraform in our workflow to help us build reproducable and idempotent Kubernetes Cluster deployments by defining our infrastructure as code.
Terraform is an open-source infrastructure as code software tool created by HashiCorp. It enables users to define and provision a datacenter infrastructure using a high-level configuration language known as Hashicorp Configuration Language (HCL), or optionally JSON. Source
This blog post is going to dive you through a
minimal (one node) Kubernetes installation using Terraform and terraform-rke-provider which uses rke under the hood
with Kubernetes Dashboard included.

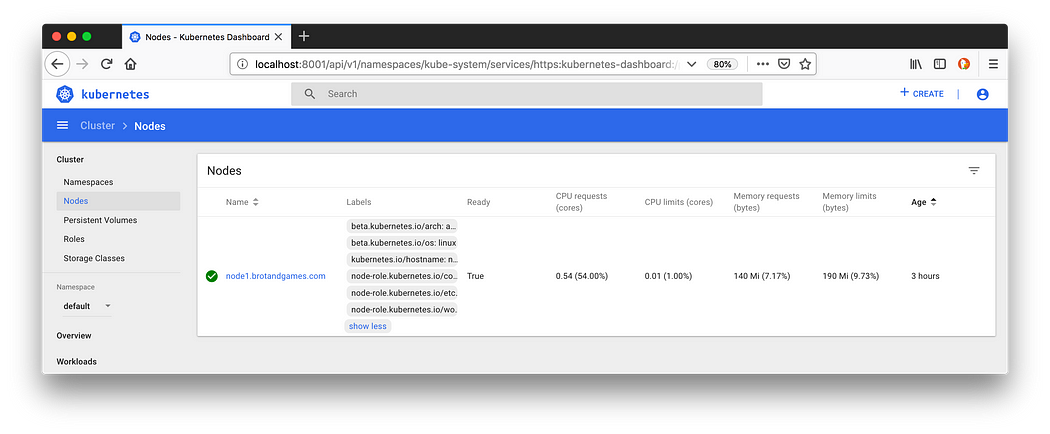
Kubernetes Dashboard
The resulting Kubernetes Cluster is easily extensible to N nodes.
Prerequisites
Basic knowledge of Kubernetes, RKE and Terraform
A workstation (probably your Computer/Laptop) with terraform, terraform-rke-provider and kubectl installed — referred as devstation
A (virtual) machine with SSH access keys — referred as node1 Minimum: 2GB RAM / 1 vCPU
Recommendation: 4GB RAM / 2 vCPU
Overview
Prepare node (virtual/bare metal machine)
Create project folder where the resulting files will be stored
Create Terraform resources in main.tf
Initialize Terraform, validate and apply configuration
Get Kubernetes Dashboard token and login
Step-by-step guide
1. Prepare node1
SSH into your (virtual) machine node1 and install Docker version needed for Kubernetes (as of May 2019: 18.06.2; Example: ubuntu).
2. Create project folder and main.tf
Create a project folder (where the resulting files will be stored) on your devstation — we are going to call it my-k8s-cluster— and create an empty main.tf file. Terraform by default reads all files ending with .tf and forms our infrastructure.
$ mkdir my-k8s-cluster && cd my-k8s-cluster
$ touch main.tf
3. Create Terraform resources in main.tf
Since we want to use the terraform-rke-provider we have to take a look at the docs. The Terraform rke community provider gives us one additional resource: rke_cluster.
It takes configuration written in HCL to reflect all the possibilites to configure rke under the hood. See the full example in the terraform-rke-provider repository.
We need two configuration blocks: nodes and addons_include. Let’s update our main.tf.
resource "rke_cluster" "cluster" {
  nodes {
    address = "node1.brotandgames.com"
    user    = "root"
    role    = ["controlplane", "worker", "etcd"]
    ssh_key = "${file("~/.ssh/id_rsa")}"
  }  addons_include = [
    "https://raw.githubusercontent.com/kubernetes/dashboard/v1.10.1/src/deploy/recommended/kubernetes-dashboard.yaml",
    "https://gist.githubusercontent.com/superseb/499f2caa2637c404af41cfb7e5f4a938/raw/930841ac00653fdff8beca61dab9a20bb8983782/k8s-dashboard-user.yml",
  ]
}
The nodes block takes arguments for accessing our node (address, user, ssh_key). Please update address, user and ssh_key to reflect your needs.
Further you can specify the role of the node (controlplane, worker, etcd). Since we are deploying a minimal cluster with one node we need to set all roles for our first node in the cluster.
By using addons_include you can define any add-on that you want deployed after the Kubernetes Cluster is deployed. We want to install the Kubernetes Dashboard into the Cluster including a Dashboard User (heavily inspired by this blog post).
resource "local_file" "kube_cluster_yaml" {
  filename = "${path.root}/kube_config_cluster.yml"
  sensitive_content  = "${rke_cluster.cluster.kube_config_yaml}"
}
The second resource local_file is needed to output our Kubernetes config kube_config_cluster.yml for further usage by kubectl or helm.
Since the rke_cluster resource is referenced in the local_file resource Terraform will first create the Kubernetes Cluster defined by rke_cluster and then ouput our config defined by local_file (Resource Dependencies).
4. Initialize Terraform, validate and apply configuration
When we have finished codyfing our infrastructure it’s time to validate and apply our configuration.
First we have to initialize Terraform with terraform init.
$ terraform init
...
* provider.local: version = "~> 1.2"
* provider.rke: version = "~> 0.11"
...
Terraform has been successfully initialized!
Then we can use terraform validate to validate our file(s) (currently only main.tf) and terraform plan to see what actions terraform will perform.
$ terraform validate
$ terraform plan
Refreshing Terraform state in-memory prior to plan...
...
Terraform will perform the following actions:

  + local_file.kube_cluster_yaml
      id:                         <computed>
      ...

  + rke_cluster.cluster
      id:                         <computed>
      ...
If everything is as expected we can apply our configuration (we can call this step deploy) with terraform apply.
$ terraform apply
...
rke_cluster.cluster: Creation complete after 3m11s (ID: node1.brotandgames.com)
...
local_file.kube_cluster_yaml: Creation complete after 0s (ID: 4bd2da6f5c62317e16392c2a6b680f96f41bb2dc)

Apply complete! Resources: 2 added, 0 changed, 0 destroyed.
You should see a terraform.tfstate file where Terraform stores the state of your infrastructure (should be .gitignored due to possibly sensitive information) and a kube_config_cluster.yaml file (>> .gitignore) in the project folder after this step finished.
$ ls
kube_config_cluster.yml    main.tf            terraform.tfstate
5. Get Kubernetes Dashboard token and login
The last part is heavily inspired by this blog post.
Before you can visit the Kubernetes Dashboard, you need to retrieve the token to login to the dashboard. By default, it runs under a very limited account and will not be able to show you all the resources in your cluster. The second addon we added when creating the cluster configuration file created the account and token we need (this is based upon github.com/kubernetes/dashboard/wiki/Creati..)
SourceSource)
$ kubectl --kubeconfig kube_config_cluster.yml -n kube-system describe secret $(kubectl --kubeconfig kube_config_cluster.yml -n kube-system get secret | grep admin-user | awk '{print $1}') | grep ^token: | awk '{ print $2 }'
Copy the whole string and set up the kubectl proxy as follows:
$ kubectl --kubeconfig kube_config_cluster.yml proxyStarting to serve on 127.0.0.1:8001
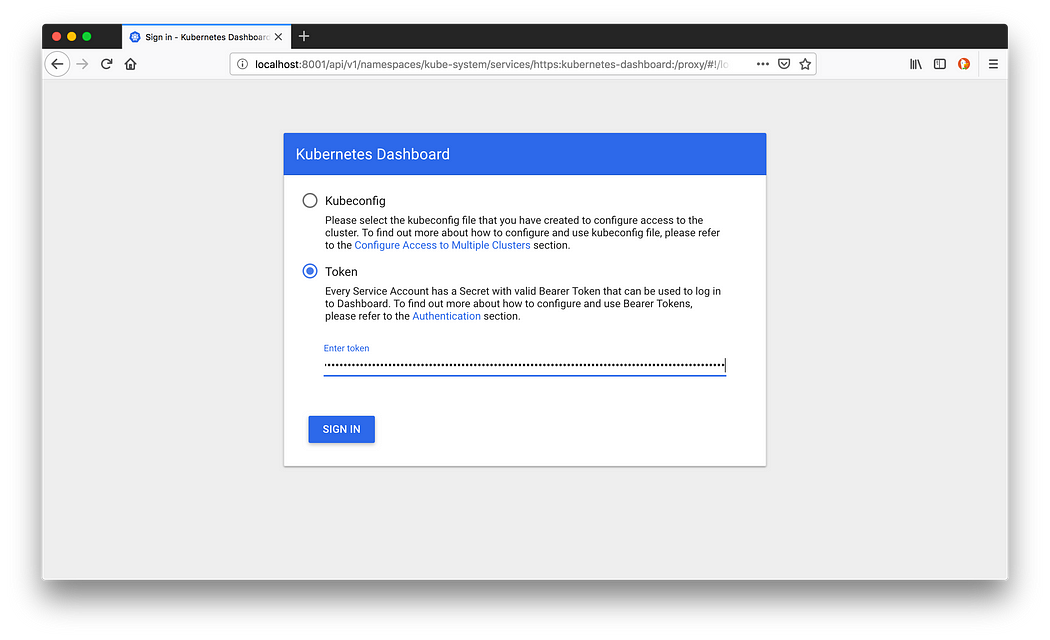
Now you can login at http://localhost:8001/api/v1/namespaces/kube-system/services/https:kubernetes-dashboard:/proxy/ with the token copied in the step before.

Login using the retrieved token

Kubernetes Dashboard
Conclusion
The final result is a running Kubernetes Cluster with one node.
$ kubectl --kubeconfig kube_config_cluster.yml get nodes
NAME                     STATUS   ROLES                      AGE
node1.brotandgames.com   Ready    controlplane,etcd,worker   2m32s
It can be easily extended to N nodes by copying the nodes block in main.tf N-1 times, configuring further machines and applying the configuration with terraform apply.
resource rke_cluster "cluster" {
  nodes {
    address = "node1.brotandgames.com"
    user    = "root"
    role    = ["controlplane", "worker", "etcd"]
    ssh_key = "${file("~/.ssh/id_rsa")}"
  }
  nodes {
    address = "node2.brotandgames.com"
    user    = "ubuntu"
    role    = ["controlplane", "worker", "etcd"]
    ssh_key = "${file("~/.ssh/id_rsa")}"
  }
  # Rest ommitted
}
Where to go further?
Add
nodesto the resulting cluster by editingmain.tfand executingterraform applyInstall Cert-manager and Rancher (including TLS) via Helm manually with instructions from our previous blog post about Kubernetes and Rancher or try to terraform the manual steps
Deploy your application by using a Helm Chart and utilizing the official Terraform provider for helm
I am Sunil kumar, Please do follow me here and support #devOps #trainwithshubham #github #devopscommunity #devops #cloud #devoparticles #trainwithshubham
Connect with me over linkedin : linkedin.com/in/sunilkumar2807
