In this article, you will learn to launch an EC2 instance using Ansible from the local machine. Before starting, you can understand Ansible as a radically simple IT automation engine that automates cloud provisioning, configuration management, application deployment, intra-service orchestration, and many other IT needs.
So if you are using Ansible to launch an EC2 instance you can set this up with CI/CD, dynamic creation on the instance. There are many use cases you can implement using Ansible. So let’s get started.
For working on Ansible we need to first set up a few things,
AWS user account
Ansible
Python
Boto
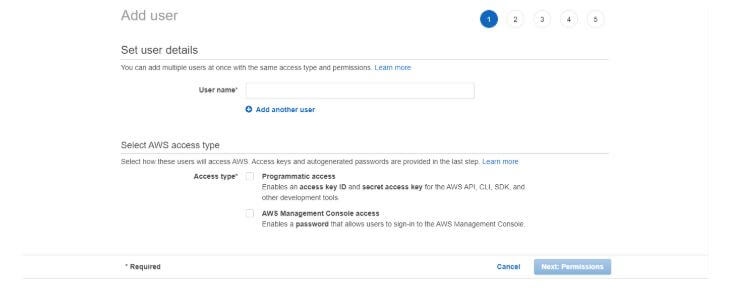
For creating the AWS account just go to the Amazon AWS server and follow the signup process. Once the AWS account gets created you need to create the IAM user (As we will need a secret key and secret ID).
Open the AWS Console, search for IAM (Identity and Access Management) and follow these steps to create a user and take note of the Access Key and Secret Key that will be used by Ansible to set up the instances. (For account access just give Programmatic access as of now.) You can simply connect with a Python development company like Mindbowser that would handle some of your hassles.
Now if you go to the Amazon console you will see the server is launched successfully. Also with this, you are all set for Deploying Go App on AWS EC2 Server.

Once you are done with the AWS account and the User creation, you can move forward and install the required things.
Ansible
1. Install Ansible on a RHEL/CentOS Linux based system
- $ sudo yum install Ansible
2. Install Ansible on a Debian/Ubuntu Linux based system
$ sudo apt-get install software-properties-common
$ sudo apt-add-repository ppa:Ansible/Ansible
$ sudo apt-get update
$ sudo apt-get install Ansible
3. Install Ansible using pip
$ sudo pip install Ansible
$ Once installed you can verify by Ansible –version this command.
Python
$ sudo apt-get update
$ sudo apt-get install python3.6
$ You can follow this link for more details.
Boto
Boto is a Python package which provides an interface to AWS.
1. First, install pip
$ sudo apt install python3-pip or
$ yum install python-pip
2. Now install boto
- $ pip install boto
Now, we are done with the package installation, we can move ahead and start writing our Ansible playbook.
Note: There are multiple ways you can install the above packages. I have added the ones that I followed but you can install as per your knowledge.
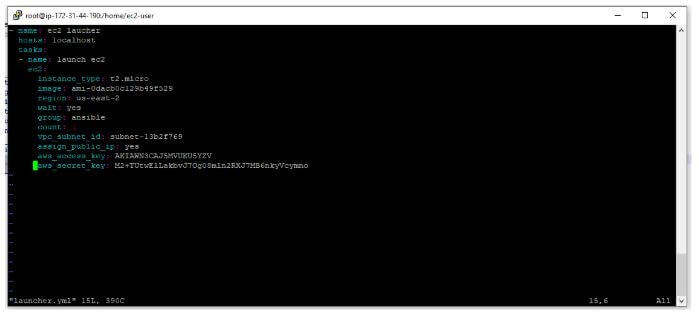
Now open a terminal and create a file with the extension .yml or .ymal, add below script and save.
# Basic provisioning example
- name: Ansible test
hosts: localhost
tasks:
- name: launching AWS instance using Ansible
ec2:
key_name: aws_instance_Ansible
instance_type: t2.micro
image: ami-0dacb0c129b49f529
region: us-east-2
wait: yes
group: Ansible
count: 1
vpc_subnet_id: default
assign_public_ip: yes
aws_access_key: ***********xxxxxxxx
Aws_secret_key: ***********xxxxxxxx

Hosts Add [webserver] localhost in /etc/Ansible/hosts file as my internet is running on the local server. If the file does not exist, create one at the same location, then add.

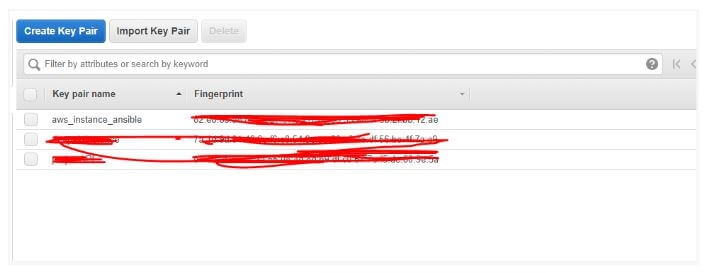
Key_name
Go to EC2 dashboard -> Key pairs -> Create key pair -> Copy key pair name

Instance_type
You can select the instance type whichever you want to launch. Go to EC2 dashboard -> Launch instance -> Check instance type.
Image
Go to EC2 dashboard -> Launch instance -> ami id (Image id)

Vpc_subnet_id
I made it default as I don’t have any VPC configuration.
Add your aws_access_key and aws_secret_key which you got from IAM user creation. The rest are the basic details. If you want more details you can visit the Ansible official website. Now our Ansible file is ready.
Run below command to check whether Ansible is ready to launch EC2 or not.
Ansible-playbook -C filename.yml
Where -C will check if everything is ready or not.

Once everything looks good, run below command and within a minute your EC2 server will be launched.
Ansible-playbook filename.yml

Now if you go to Amazon console you will see the server is launched successfully.
I am Sunil kumar, Please do follow me here and support #devOps #trainwithshubham #github #devopscommunity #devops #cloud #devoparticles #trainwithshubham
Connect with me over linkedin : linkedin.com/in/sunilkumar2807
