Jenkins is an open-source automation tool for Continuous Integration (CI) and Continuous Deployment (CD). It is a server-based system that runs in servlet containers like Apache Tomcat. Jenkins is one of the most used DevOps tools used along with other cloud-native tools and allows developers to build, test and deploy software seamlessly.
Prepare Your System
Before moving on to Jenkin installation, make your system ready. You can use an Azure Virtual Machine, AWS Instance or any other cloud service. We will use Azure Virtual Machine in this blog. Most configuration steps will be the same in all clouds, but you can also use Azure VM to follow the steps with us for better understanding.
Step 1) Create your Virtual Machine in Azure and pick the operating system that suits you best. Generally, Ubuntu is preferred more, and we will be using the same.
You can refer to this blog for a detailed VM installation guide: Create and Connect Ubuntu Virtual Machine in Azure.
Step 2) After creation, connect to your Virtual Machine. From here, we will assume that you have already created and logged in to your system successfully.
Step 3) Open your Virtual Machine in Azure and search for networking settings in the search bar, shown in the image below. Here you need to add one Inbound Port Rule, so click on the highlighted button.

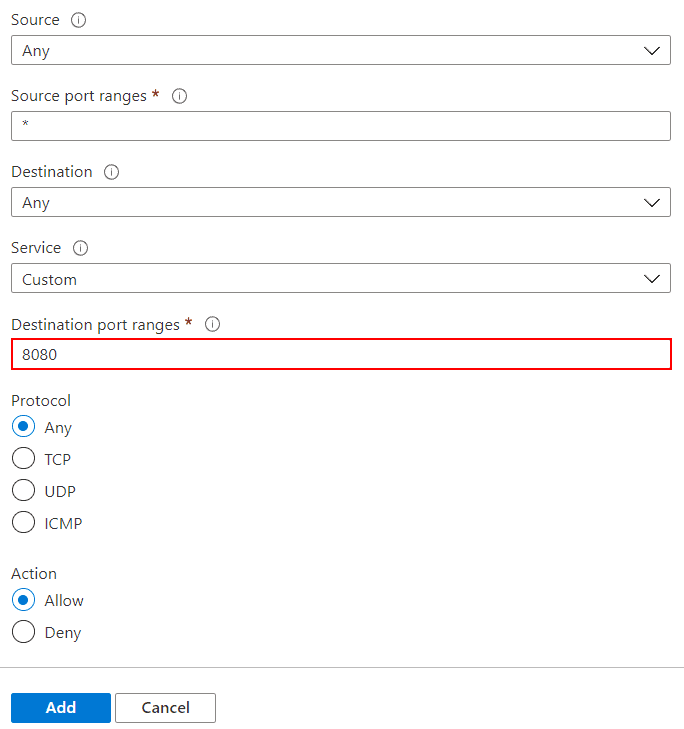
Step 4) Leave the default setting in the window and check for the destination port ranges. Confirm the port number is 8080, as highlighted in the image below. Now, add this rule, and it will be used in the upcoming steps to run Jenkins. Similarly, create one more port number, 8090 and update the default name of this port to avoid conflicts. We will use this port to access the Tomcat and the webpage in the upcoming steps.
Download and Install Jenkins
After making your system ready, log in to your system and proceed with Jenkins installation.
There are two types of Jenkins release available:
Stable (LTS): This release is fully stable, bug-free and released in the long term.
Regular (Weekly): It is released rapidly with new features weekly.
For more information on Jenkins, visit the official Jenkins download guide here: Download Jenkins.
Step 1) First of all, you need to install Java in your system. Install the default JDK by using the below command on your system.
sudo apt update
sudo apt install default-jdk
Step 2) Now, run the below commands one by one to install the Jenkins stable version.
wget -q -O - https://pkg.jenkins.io/debian-stable/jenkins.io.key | sudo apt-key add -
sudo sh -c 'echo deb https://pkg.jenkins.io/debian-stable binary/ > /etc/apt/sources.list.d/jenkins.list'
sudo apt-get update
sudo apt-get install jenkins

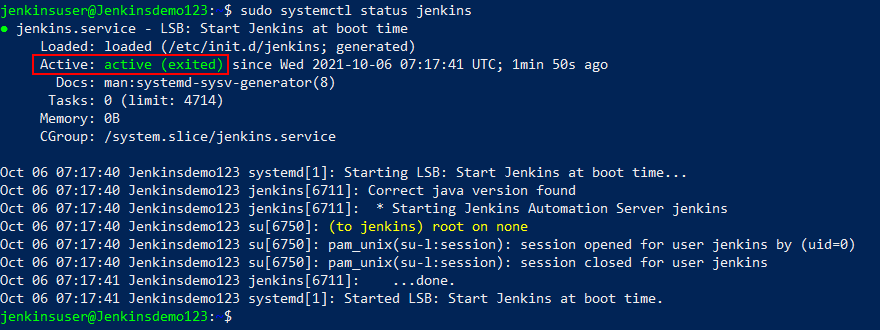
Step 3) To check whether the Jenkins is now active or not, run the below command. It will show status Active if the Jenkins is appropriately installed.
sudo systemctl status jenkins
Start and Configure Jenkins
Before creating CI CD Pipeline using Jenkins, we need to start and configure Jenkins with the following steps.
Step 1) Copy your public IP address from your virtual machine in Azure, as shown in the image below.

Step 2) We have already added port number 8080 in the previous steps while preparing our system. So, we can access our Jenkins in the browser using the URL format as youripaddress:8080.
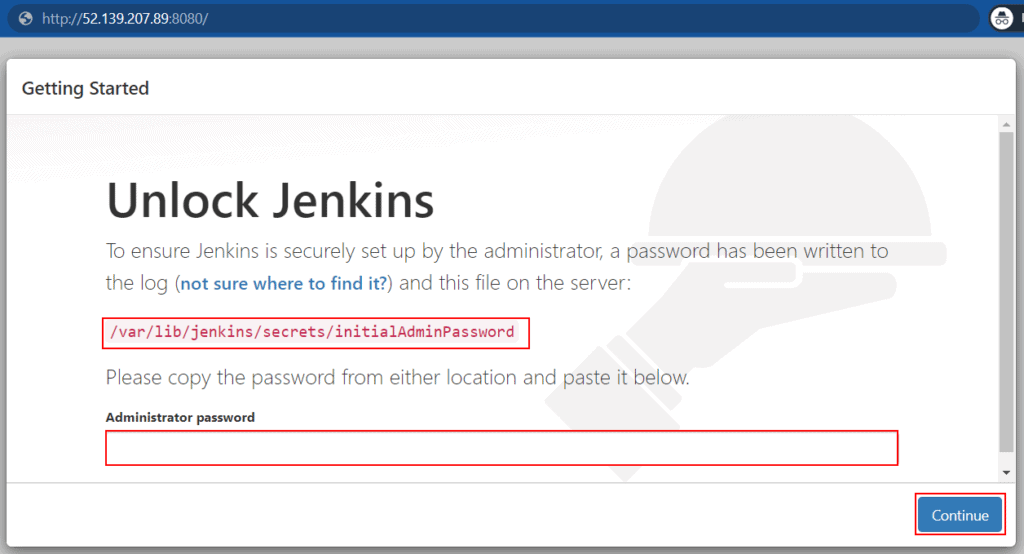
Step 3) Jenkins window will appear on your screen. You need to enter the administrator password to access Jenkins, available at the highlighted location, as shown in the above image. To fetch the pass, you need to go back to your Jenkins server and use the below code with the highlighted location. Copy the pass that will appear on your screen after running the below code and paste it on the password field.
sudo cat /var/lib/jenkins/secrets/initialAdminPassword
Step 4) After successful login, you will be asked to select the plugin installation type. Select the ‘Install suggested plugins‘ tab to install all the needed plugins automatically.

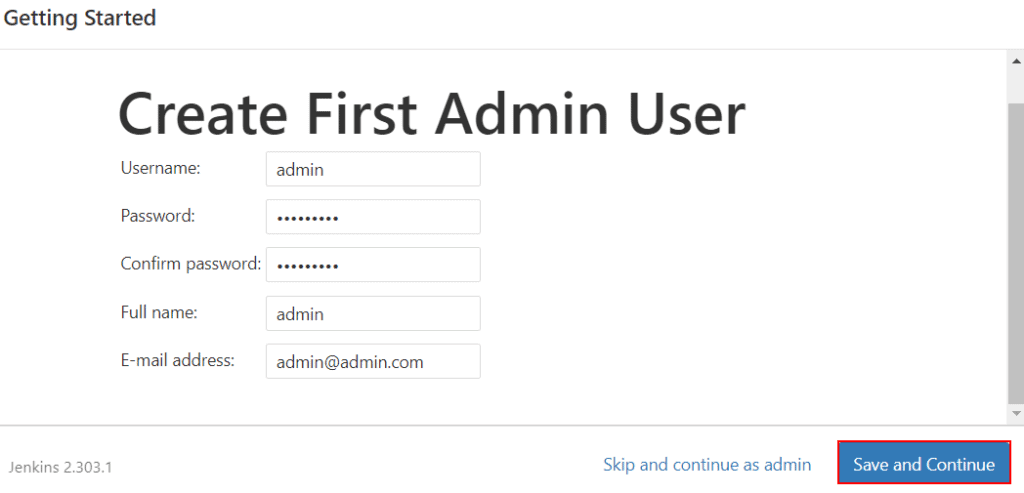
Step 5) It will take few minutes to install all the plugins. Now, Jenkins will ask you to add a new admin user. Fill in all the details and keep it safe as it will be used to login back to your Jenkins. Click on all the finish buttons coming up ahead, and you will get successfully logged in to your Jenkins dashboard.
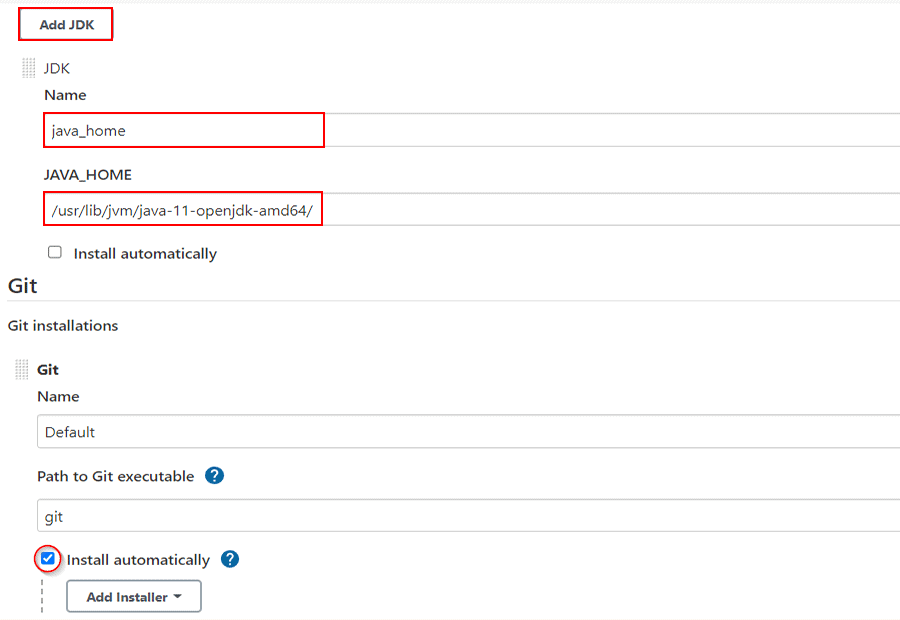
Step 6) Now, we need to specify the Java location to Jenkins. Go back to your server command prompt and use the code below to fetch the directory of Java. Multiple directories will be listed using the below code. In our case, the directory is: ‘/usr/lib/jvm/java-11-openjdk-amd64/bin/java’.
find / -type f -name java

Step 6) Copy the above location and go back to your Jenkins Dashboard. Look for Global Tool Configuration under the Manage Jenkins menu, as shown in the image below.

Step 7) Unselect the Install automatically button from the JDK window and fill the fields. Paste the java location path and trim it as shown in the image below. In the below Git window, select the install automatically checkbox.
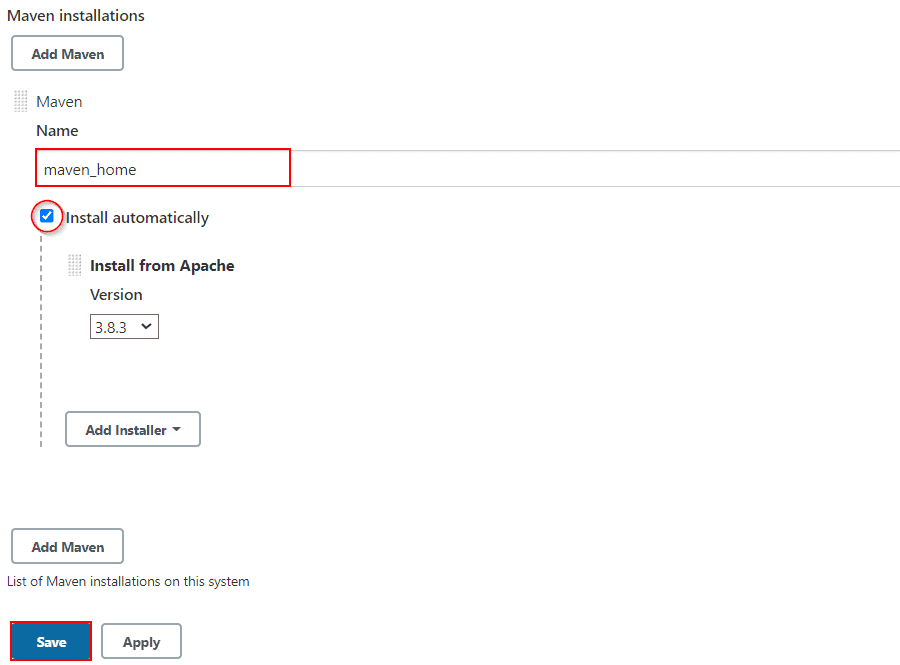
Step 8) Similarly, check the box for Maven and fill the name field. Save all the settings, and now the configuration of Jenkins is completed.
Create CI/CD Pipeline Jenkins
We can now start creating pipelines using Jenkins after all the configuration and setup.
Continuous Integration
Step 1) Create New Item, select Freestyle Project and provide a name to your item.

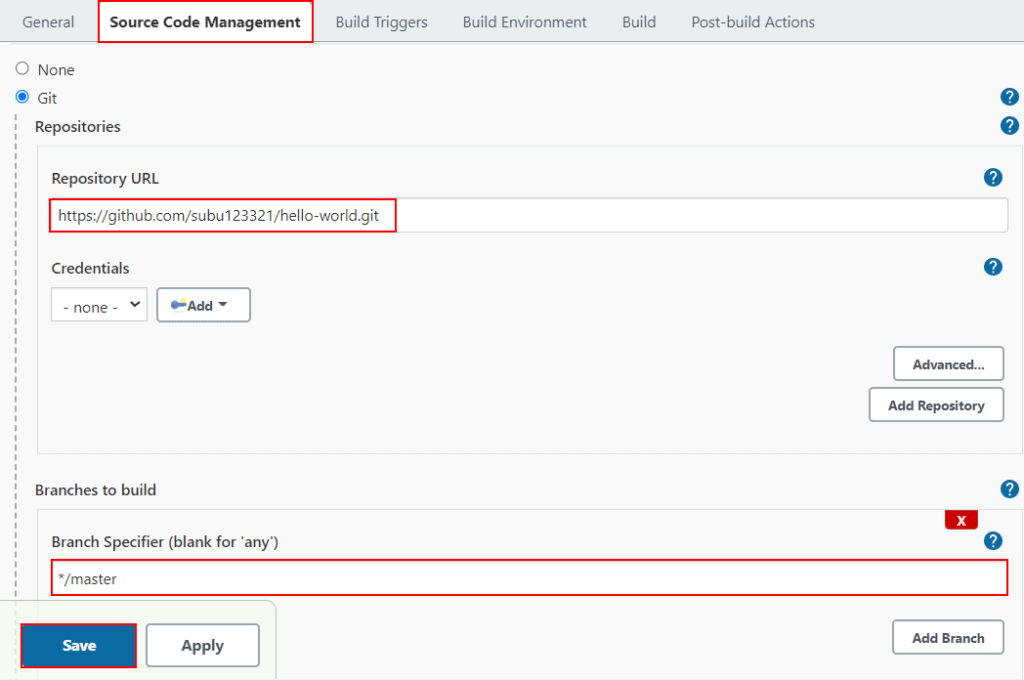
Step 2) Switch to the Source Code Management window and paste your Github repository link. Specify your branch name of the repository below and Save it.
[Note: The above-linked Github repository ‘gihub.com/subu123321/hello-world‘ contains a ‘pom.xml‘ file used for Java compilation and generates a web app. It will be deployed to the server]
Step 3) Now click on Build Now button from the menu. With this step, all the repository files will be fetched by Jenkins. Click on Configure to go back to the same settings page.

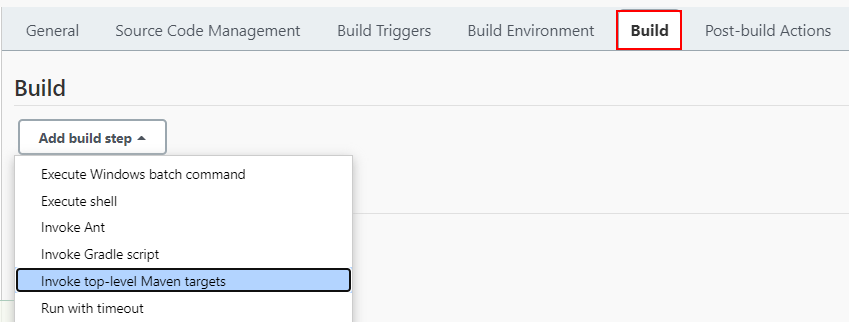
Step 4) Click on Build Tab and select build step as ‘Invoke top-level Maven targets‘.
Step 5) Select your maven name from the drop-down menu. Fill the goals with the multiple jobs you need to perform and separate them with one space. These goals are available in your repository, and you need to invoke them using Maven. Save it and again click on the ‘Build Now‘ button from the menu as we did in the previous steps. Now the maven commands will be executed that will generate a war file.

Step 6) If you want to check the war file created in the previous steps, visit the workspace on your Jenkins dashboard or just run the directory commands in your server. Your directories and project name can vary, so you can use the ‘ls‘ command to see the list inside that directory and also keep in mind the directory name is case sensitive.
cd /var/lib/jenkins/workspace/
ls
cd /Demo
cd /webapp/target
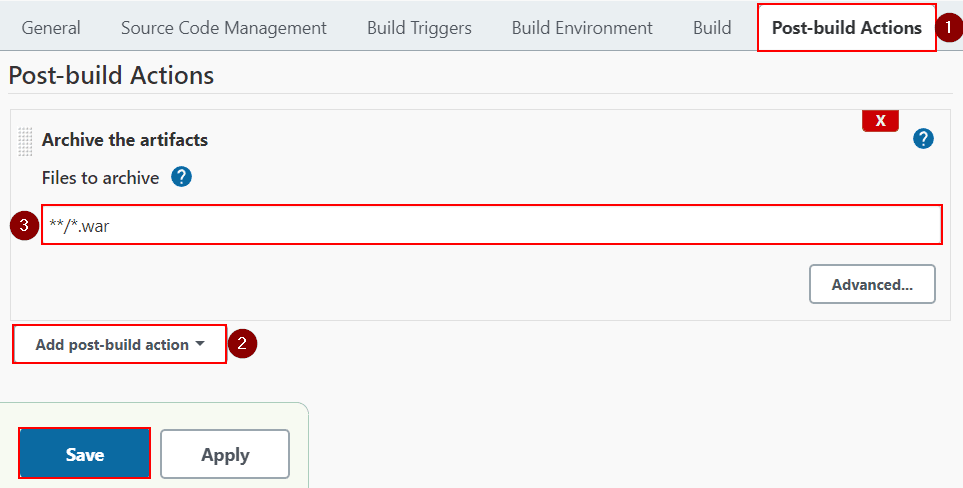
Step 7) Now go back to Configure and visit the ‘Post Build Actions‘ tab. Click the drop-down and select ‘Archive the Artifacts‘ from the options. In the field, write down ‘\*/*.war*‘ as shown in the image below. It will fetch all the directories and get the war file wherever it is present. Click again on Build Now button, and you will now see the Artifacts in the Jenkins dashboard.
Continuous Deployment
Step 8) We need to install Apache Tomcat, and for this, you need to visit the Tomcat Download page. In the core section, hover over the ‘tar.gz’ link and copy it. Now, use the below commands in your server one by one.
First, four commands will create one temporary directory and user group to access the file. Here, use the command curl -O ‘paste tomcat download link‘ as shown in the command below.
Use further commands to create a tomcat directory and extract the gzip file. Just cross-check the version number of the Tomcat that you are downloading and extracting.
Now the permission of the files needs to be configured with the below commands. In the last command, replace it with your username by which you are accessing the server.
sudo groupadd tomcat
sudo useradd -s /bin/false -g tomcat -d /opt/tomcat tomcat
cd
cd /tmp

curl -O https://dlcdn.apache.org/tomcat/tomcat-9/v9.0.54/bin/apache-tomcat-9.0.54.tar.gz
sudo mkdir /opt/tomcat
sudo tar xzvf apache-tomcat-9.0.54.tar.gz -C /opt/tomcat --strip-components=1

cd /opt/tomcat
sudo chgrp -R tomcat /opt/tomcat
sudo chmod -R g+r conf
sudo chmod g+x conf
cd ..
sudo chown -R jenkinsuser:jenkinsuser tomcat/
Step 9) We need to update the port number from 8080 to 8090 in the server.xml file. We are updating it as this port number is already in use by Jenkins, and we have created 8090 in Azure VM for Tomcat. Use the below commands to edit the file. When you enter the file, click the INSERT button to edit. Now search for a similar code, as shown in the image below. Update the port number to 8090. To save the file, press the Esc key, type :wq and click on Enter button.
cd
cd /opt/tomcat/conf
vi server.xml

Step 10) Similarly, we need to edit the ‘tomcat-users.xml’ file to update the roles that enable us to deploy files using Tomcat. In the file before tomcat-users ending code, paste the below roles code. To save the file press, the Esc key, type :wq and press Enter.
cd
cd /opt/tomcat/conf
vi tomcat-users.xml

<role rolename="manager-gui"/>
 <role rolename="manager-script"/>
 <role rolename="manager-jmx"/>
 <role rolename="manager-status"/>
 <user username="admin" password="admin" roles="manager-gui, manager-script, manager-jmx, manager-status"/>
 <user username="deployer" password="deployer" roles="manager-script"/>
 <user username="tomcat" password="s3cret" roles="manager-gui"/>

Step 11) We also need to update the context.xml file to remove the IP restriction. Use the same steps to edit the file with the below commands. Remove all the content present inside ‘context‘ as shown in the image below and save it.
cd
cd /opt/tomcat/webapps/manager/META-INF
vi context.xml

Step 12) Now, all the files are edited successfully. To update the Tomcat, we need to restart the system to accept all our changes. Use the below commands in the server for shutdown and startup of Tomcat. With this step, Tomcat is ready to deploy our container.
cd
cd /opt/tomcat/bin/
./shutdown.sh
./startup.sh
Step 13) In the Jenkins Dashboard, click on Manage Jenkins and then visit Manage Plugins.
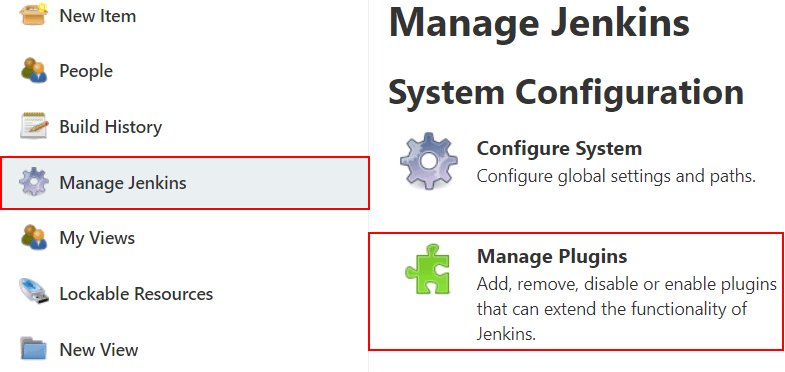
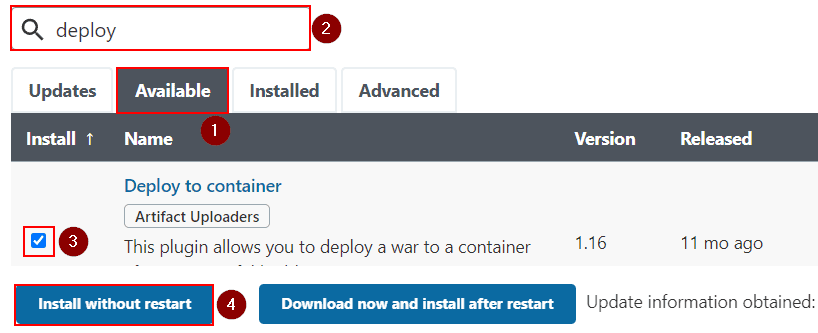
Step 14) Click on the Available tab and search for the ‘Deploy to Container‘ plugin. Select the plugin and click on the ‘Install without restart‘ button.
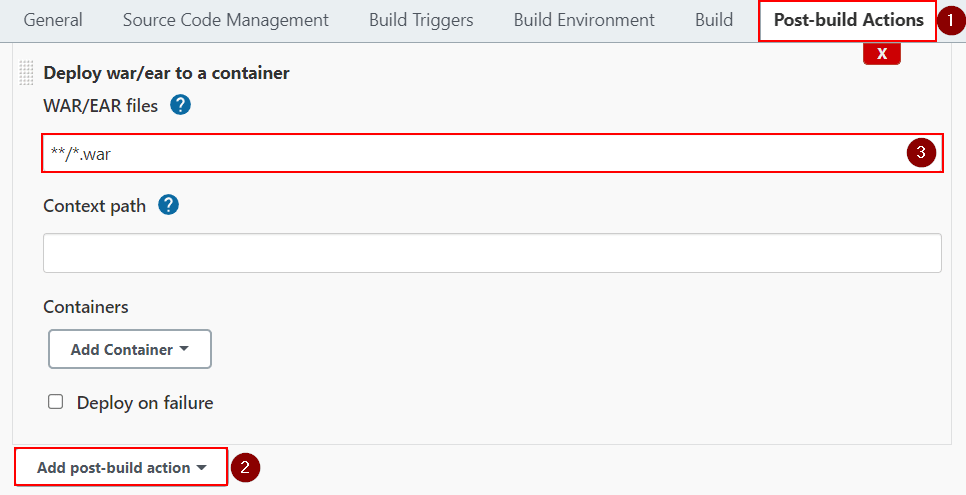
Step 15) Go back to your Configure window and select the Post-build Actions tab. Select the ‘Add post-build action‘ drop-down button and select the ‘Deploy war/ear to a container‘ plugin. Fill the same path of your war file here, as shown in the image below.
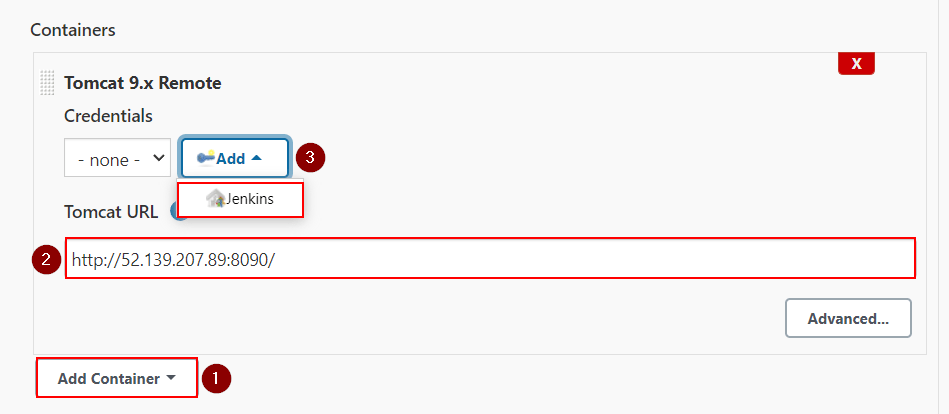
Step 16) Now click on the ‘Add Container‘ button and select the ‘Tomcat 9.x Remote‘ as we are using version 9 of the Tomcat. Fill in the URL of the same virtual machine with the new port number 8090. On the credentials drop-down button, select Jenkins.
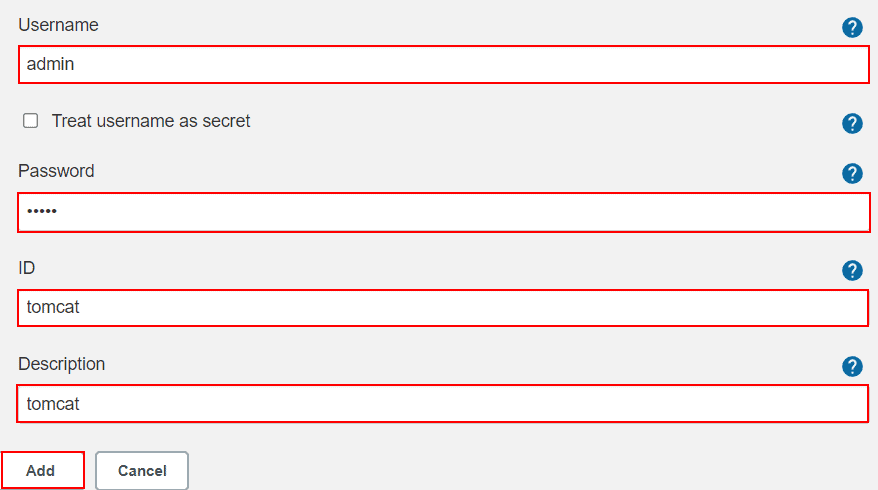
Step 17) In this window, fill in the username and password that we have used in the ‘tomcat-users.xml‘ file (in Step 10). Fill in the ID, description and click on the button ‘Add‘.
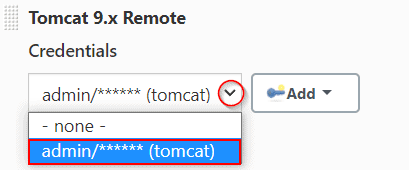
Step 18) Click on the credentials drop-down button and select the recently created credential. Save all the settings and again click on the ‘Build Now‘ button from the Jenkins dashboard. If the Build is successful, the war file will get deployed.
Final Step) Visit the address of your virtual machine, and you will see your deployment on the page. In our case, the URL is ‘52.139.207.89:8090/webapp/‘ with port number 8090 that we created for Tomcat.
Conclusion
CI CD Pipelines in DevOps enables an organization in the faster and effective delivery of software products. In this blog, we have created a Virtual Machine in Azure and followed all the steps to create CI CD pipeline using Jenkins. We used Tomcat as our container service and deployed our simple web app via Jenkins.
Credits : k21 Academy
I am Sunil kumar, Please do follow me here and support #devOps #trainwithshubham #github #devopscommunity #devops #cloud #devoparticles #trainwithshubham
Connect with me over linkedin : linkedin.com/in/sunilkumar2807
